Every year, I tear my Warn hubs down for maintenance and a general inspection. The maintenance is directed towards the bearings and anything else that looks like it requires attention. Given the environment that our axles are subjected to (big tires, water crossings, dust, mud, etc.), a couple of hours spent on the hubs is money and time well spent, in my opinion. Likewise, if you are like some Jeepers, you may have paid a shop to install your hub conversion. No problem there…..just remember that these hubs do require routine maintenance and I doubt they will get the attention to detail from a shop tech that you could actually provide. So with that being said, you now have a very good reason to tear your hubs apart and check them out.
NOTE: KevinN, one of the site’s visitors who has a Warn hub conversion, sent me a copy of the Yukon’s documentation (including their parts list). Warn sold their hub business to Yukon some time ago. Here is the Yukon hub conversion install and parts documentation.
Little did I realize that this year’s routine maintenance check would provide me with a surprise that I was not prepared for….and given the various scenarios that could have played out, I am grateful for the one that did. Let’s get started.
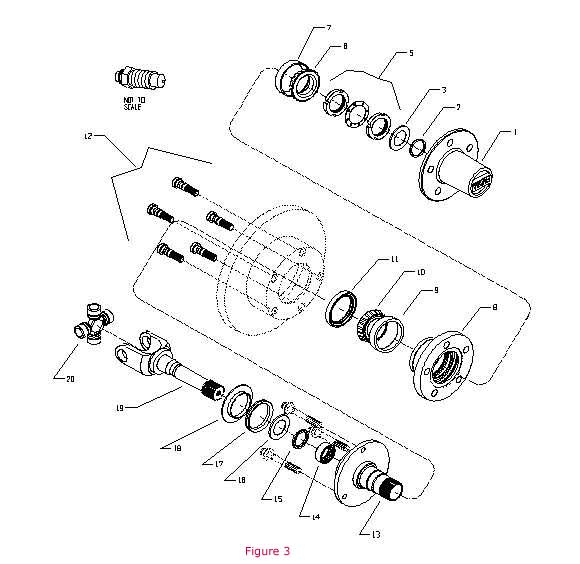
I’ve included the exploded parts diagram of Warn’s small hub conversion kit here as a quick reference as I go through the rest of this write-up.
Part #11 (isn’t it cool how Warn printed the part numbers 10 and 11 upside down in their diagram) is the grease seal that is pressed into the hub. This grease seal protects the inner workings of the hub and especially the inner bearing, part #10.
I sacrifice the grease seal each year when I pull the hub apart to grease the bearings. I’ve not found a good way to remove it without killing it in the process. A couple of seals are about $20 at the local 4×4 parts store. They may be available at NAPA too although I’ve never tried (but I do know you can get the bearings at NAPA, more on that later). So this means you need to have a couple of grease seals in hand BEFORE you start the on this project.
Let’s start with some safety…..use a jack stand along with a bottle or floor jack. You need to remove the wheel from the hub while doing this work. Do NOT rely solely on the jack to hold the axle up. Put a jack stand under the axle (one you have it lifted high enough) and be sure your tranny is in gear, parking brake set, etc. If you are parked on a slope, block the other tires as well.
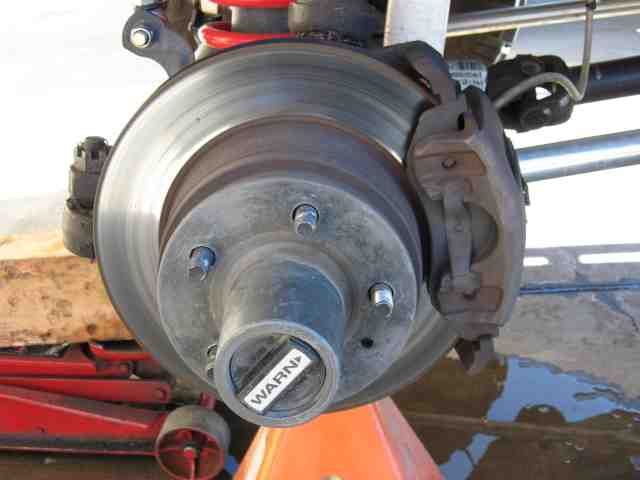
Remove the 5 lug nuts and pull the wheel off of the wheel studs. This will leave the hublock, part #1, sitting on the wheel studs. Pull the hublock off of the wheel studs.
The Warn documentation for this hub kit warns against adding grease to the inside of the hublock. I wiped off some of the “grease splatter” from around the opening of the hublock and then applied a coating of anti-seize to the rubber o-ring which is located on the back of the hublock. This o-ring helps seals the hublock internals from dust and other contaminates. The hublock was set aside for later installation.
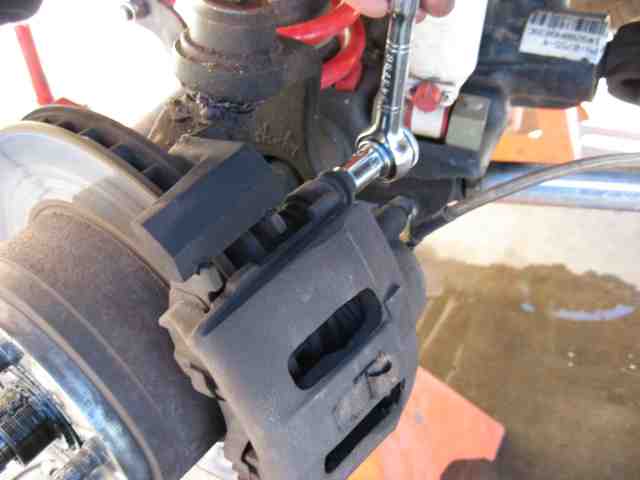
The brake caliper must be removed in order for the hub to slip off of the spindle. A 13mm hex socket or wrench removes the two caliper mounting bolts.
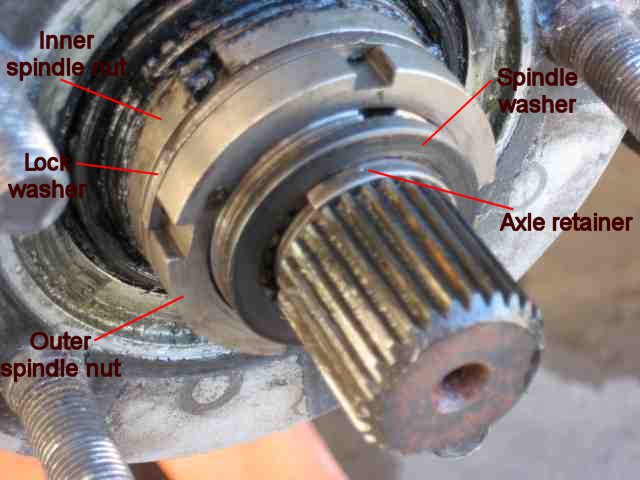
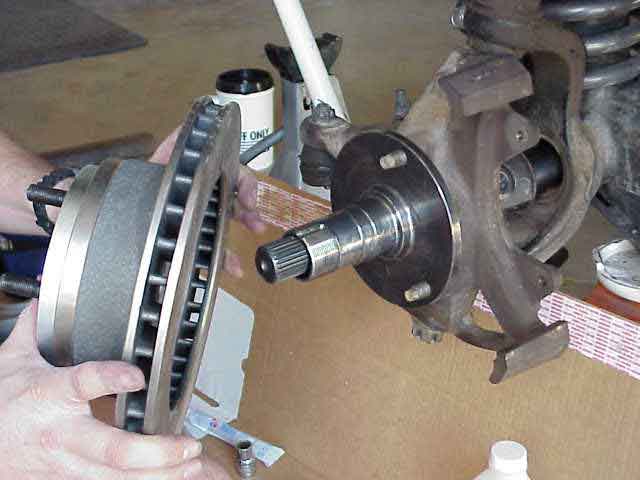
With the caliper out of the way, it is time to get the hub off of the spindle. I labeled the above photo with the names Warn uses in their hub conversion installation docs to make it a little easier.
Remove the axle retainer. I use a needle nose pliers to push the open ends of this springy clip of the groove that is machined into the axle stub shaft. Be careful you don’t “pop” it across the driveway or garage floor into some unknown place. (don’t ask me how I know)
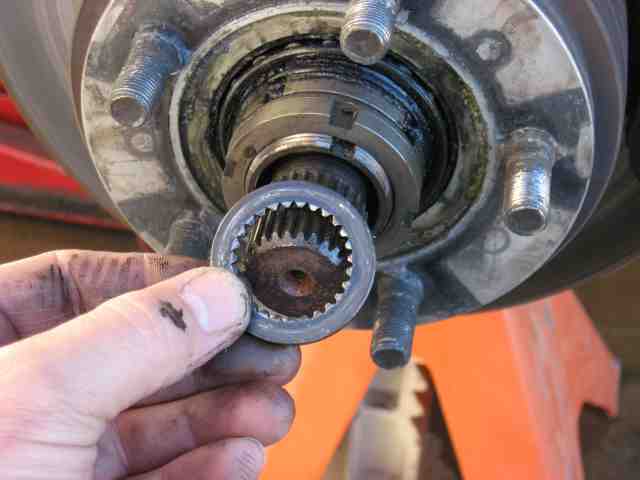
Slide the spindle washer over the splines of the axle stub shaft. You will need to line up the splines of the washer to those on the stub shaft so you can slide it off the shaft.

Using a Dana 44 spindle nut socket, remove the outer spindle nut. This is normally torqued to 150 foot pounds so you may want to use a 18″~24″ break bar to break it loose. What….you don;t have a spindle nut socket? They can usually be had at an auto parts store for about $12~$15. I got mine from the local Pep Boys a number of years ago. Unscrew the outer spindle nut (once you break it loose) and set it aside.
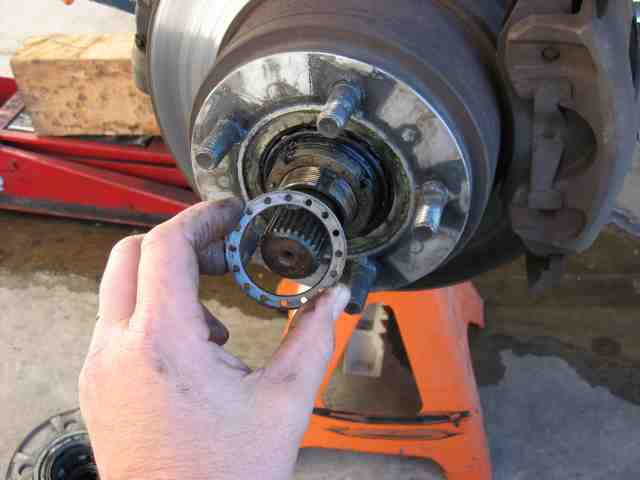
With the outer spindle nut out of the way, the lock washer can be slipped off of the spindle. Set it aside too.

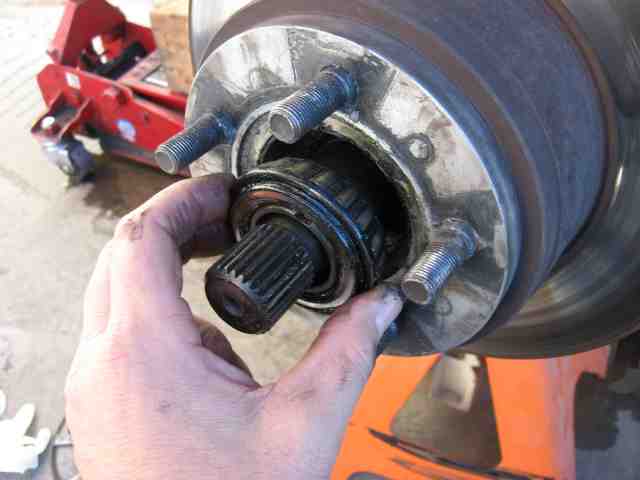
Now remove the inner spindle nut. You may or may not need to coax it loose with the spindle nut socket. It is not torqued very tight so is should be very easy to unscrew.
Warn Hub Maintenance
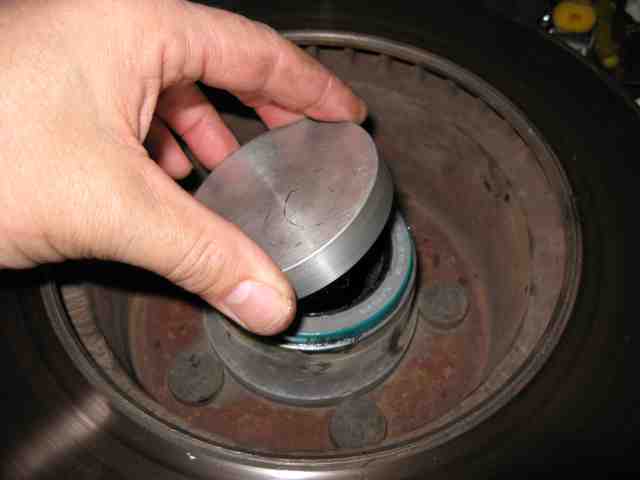
OK….you now should have unobstructed access to the outer bearing. If it doesn’t slip out of the hub, pull the hub a half inch towards the end of the spindle (away from the vehicle) and then push it back into position. The bearing will have pushed out about a half inch and you should now be able to grab it. Set the bearing aside.
Now slide the rotor/hub assembly off of the spindle and place it wheel studs down onto a piece of scrap cardboard.
Using a seal puller or a screw driver or a pair of pliers, pull the grease seal from the inward side of the hub. As I mentioned before, I sacrifice the seal as I have a new one standing by.
Remove the inner bearing from the hub and set it aside. Get out your favorite tub of high temp disc brake wheel bearing grease. I use Valvoline myself but any quality brand of disc brake wheel bearing grease will work.
Repack the hub’s inner diameter with wheel bearing grease. There should be a bunch there already (from the installation) but you need to replenish it. If it looks to be contaminated (dirt, mud, water, etc.), grab a hand full of paper towels and wipe the inside of the hub completely clean of grease, then refill it with fresh grease. It is a pretty good sized area and will take a fair amount of grease top fill this void.
Pack the inner wheel bearing with the wheel bearing grease. If you have a wheel bearing packer, use it. If you don’t, you can do it by hand. To pack by hand, grab a pair of laytex disposable gloves and put them on. Put a large glob of grease in the palm of your hand. Repeatedly force the edge of the bearing into the grease so that it fills with grease. You must “squish” the grease into the edge of the bearing until it pushed out of the other side. Then rotate the bearing about 30 degrees and start the process all over again, pushing the grease into the edge of the bearing until it pushes through. Continue working your way around the bearing, packing it with grease. It will take you about 3~5 minutes if you do this right. The goal is to completely fill the voids around all of the roller bearings inside of the cage.
With the inner bearing now serviced, install it into the inboard side of the wheel hub. Apply additional grease around the back side of the installed bearing. Fill the large radial seal cavity with grease. Press the new grease seal into the inboard side of the hub. The seal may protrude slightly from the wheel hub but should mount nearly flush with the edge of the hub. Keep the seal square to the hub as you press it into place….don’t let it get cocked in there. A flat piece of metal laid across the surface of the seal and “motivated” with light hammer tapping works well. Work your way around the seal. The idea is to get it started all the way around and then work it down into the hub until it is in position.
Now pack the outer wheel bearing in the same manner as you did the inner bearing. Again, ensure all of the voids between each roller bearing is completely filled with grease.
Install the wheel bearing into the outer end of the hub. Apply a thin coating of grease onto the shank of the spindle and slide the hub/rotor assembly back onto the spindle.
From here, it is a simple matter of installing the spindle nuts and torquing them to spec. Rather than repeating the entire process here, you can get the details from the last page of my hub conversion install write-up.
At this point, you should are done with one hub and need to repeat the process on the other hub. Once that is done, clean up your mess and call it good.
Now….the afore mentioned process was how my annual hub maintenance has gone for the past 3 years (plus the one year the hubs were installed before I serviced them for the first time).
As I mentioned at the beginning of this write-up, I had an unexpected surprise this year. To see what else could require attention, click the link to continue with the hub maintenance write-up.
Warn Hub Maintenance
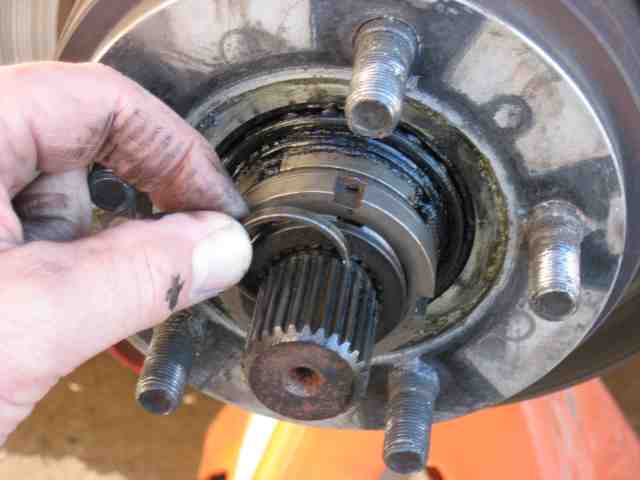
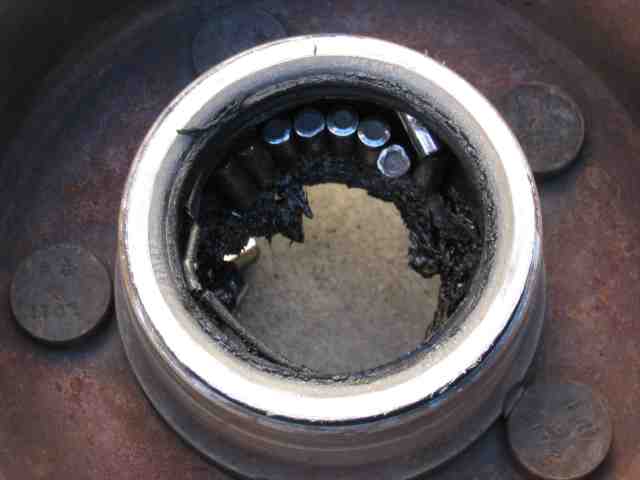
The routine maintenance task took a different direction right after I had removed the outer bearing (which went well) and I went to slide the hub off of the spindle.
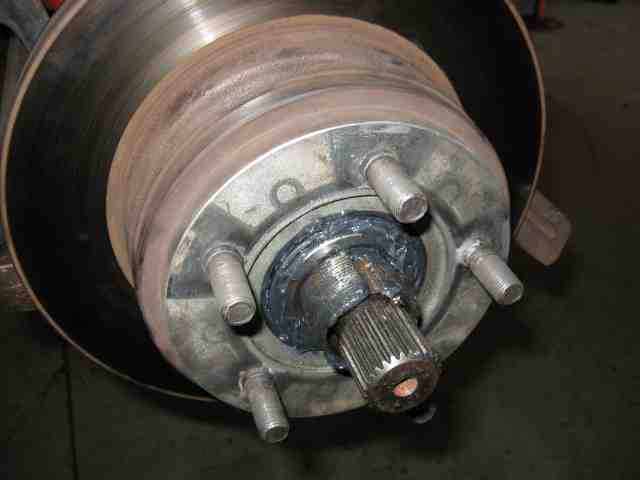
The hub would wobble around on the spindle but wouldn’t slide off. Something was preventing the hub from sliding off of the spindle. I gave it a good tug and off it came.
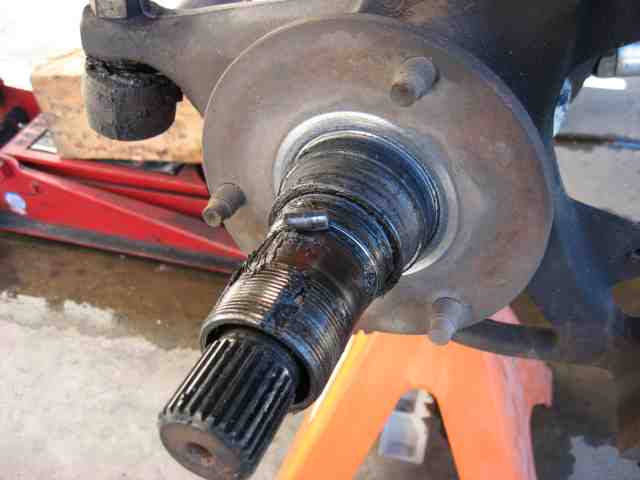
Woops! Now that didn’t look good and I wasn’t at all happy to see it. A roller bearing from the inner bearing was stuck on the grease. It may be a little hard to see in the photo (unless you are familiar with the spindle) but a portion of the bearing cage is also still on the spindle. Not good! Some gentle persuasion with a chisel and hammer, carefully catching the lip of the cage, was enough to get it to slide off of the spindle. There was a little galling on the spindle but a little bit of cleanup with a Deremel and sanding drum took care of that.
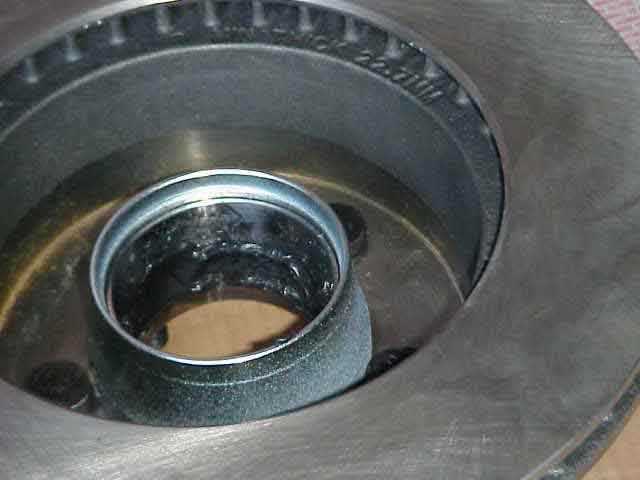
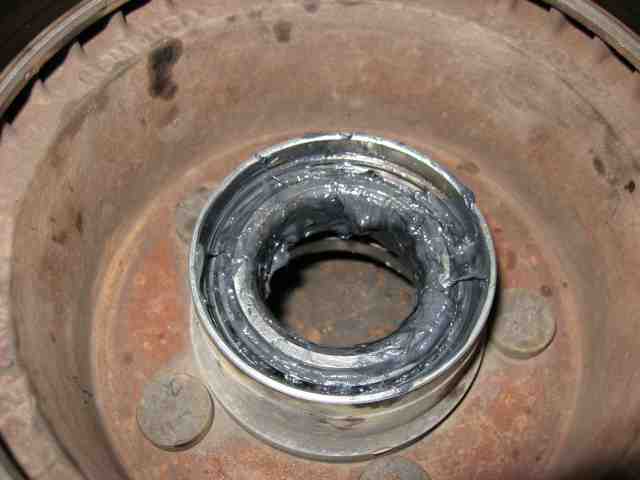
Here is a pic of the hub. What is left of the seal is still pressed into the hub. You can see some of the roller bearings loose in the hub. The grease, while there, was dried up a bit and looking bad. Not sure why the grease dried up like it did…heat? Not sure. The outer bearing and the grease at that end of the hub was in good shape. This was year number 4 for these bearings so I guess I can’t complain all that much. As I write this, I’ve not pulled the other hub apart to see how it is doing (but will this weekend).
So there I was with no bearings in hand and only a pair of grease seals. I was a half hour’s drive from the 4×4 shop where I usually get my Warn parts. A quick call to the nearby CarQuest found them with an outer bearing but no inner bearing (yes, they were able to cross-reference the part numbers provided in the Warn documentation). Well, I needed the inner bearing for sure and since I was replacing the inner bearing, the outer bearing would be replaced at the same time….and that would be done for the other hub too.
Next on the phone list was the nearby NAPA store. They too were able to cross-referenced the Warn part numbers over to their stock numbers. They had two sets of each in stock so I made a run over to the store and picked them up.
I guess I should pass along some part numbers for future reference.
Inner bearing and race = NAPA BR50 (SKF bearing made in Japan) ~ $19
Outer bearing and race = NAPA BR35 ( SKF bearing made in Japan) ~ $18
The grease seal that goes next to the inner bearing is a CR (Chicago Rawhide) 22353 ~ $8.50
OK….back to the problems at hand.
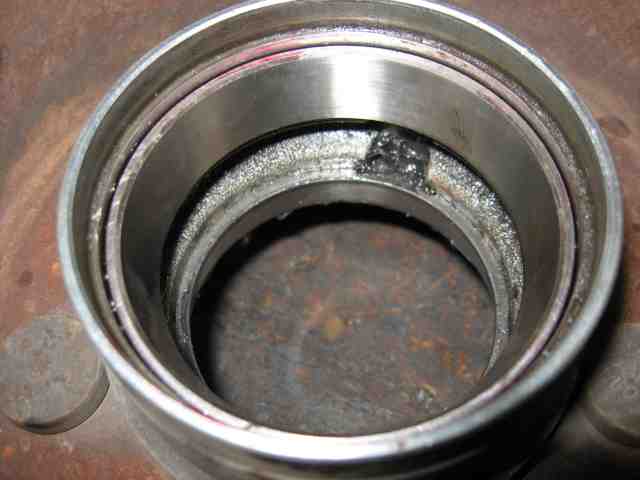
I had new bearings in hand and so got to the task of installing the races in the hub. The outer bearing race pressed into position just fine. The inner bearing race had a problem…..too much clearance. The hub got a little “larger” where the race seats and so there was about .010″ clearance where it should be a tight press fit.
I put the project on hold and ordered a new hub…..with a one week expected delivery date.
During my down time, I called my buddy Blaine in CA to ask him about his experience with the small hub kit. He’s installed many of them and has more experience with them than anyone I know. After I told him about my problem with the bearing race, he told me of a method I could try that would most likely fix my problem and get me back on the road. He told me that I could use a center punch to stipple the area where the race was seated which would cause metal to kick up (from the center punch) and take up the extra clearance. OK….it was worth a try. Monday (my regular day off from work) was coming up and I was ready to give it a try. I had nothing to lose (well, perhaps a grease seal) if it didn’t work as hoped.

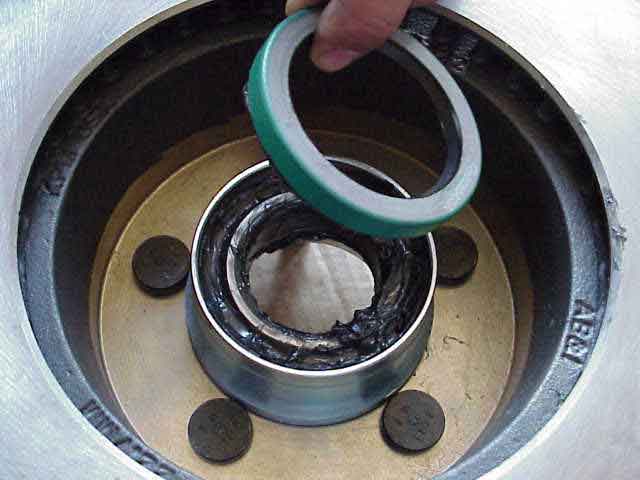
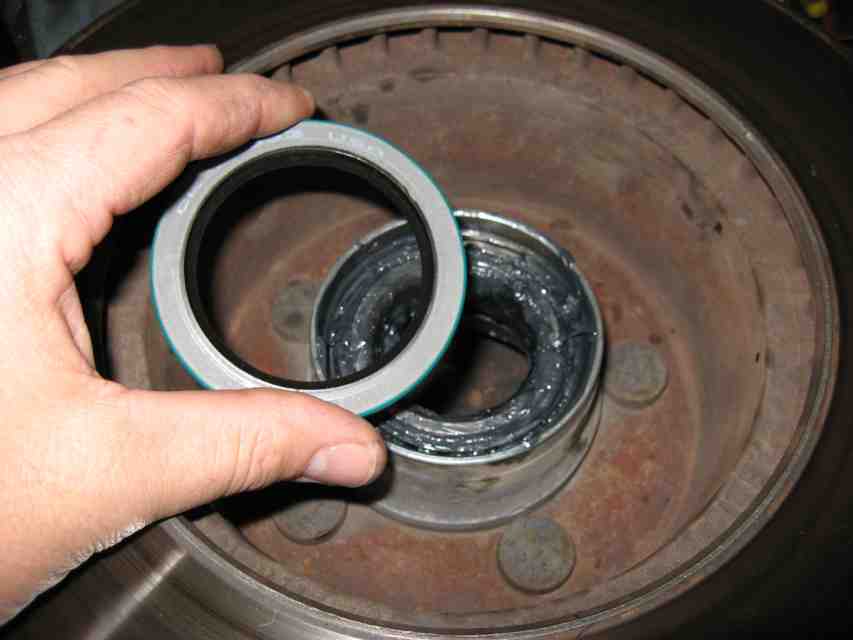
You can see all of the center punch hits around the inner surface of the hub. This is where the inner seal is seated. It took me about 10 minutes to do the work….nothing hard about it….hold punch, hit lightly with hammer, move punch about 1/8″ away from previous point…..repeat process. I checked my progress as I made my way around the hub. As I laid down more and more punch marks, the fit continue to get tighter until I could not longer push it in by hand. I still had about a quarter of the surface to finish so it was working just as Blaine said it would. (Thanks Blaine!)
The last part of this “fix your hub” process was to apply Loctite (green is 1st choice, red is 2nd choice) to the bearing race and then press it into position. I used a brass drift punch and a hammer to accomplish this step. I’ll add that it is important to make sure the fit is tight…..you need to immobilize the race so it doesn’t spin once everything is put back together.
Warn Hub Maintenance
I grabbed one of the new inner bearings that I had picked up at the NAPA store and spent a few minutes hand packing the bearing. I had picked up a new tub of Valvoline disc brake wheel bearing grease. It’s important, in my opinion, that you properly pack the bearing either by hand or using a bearing packing tool. Either way, pack that bearing nice and full of grease.
With the inner bearing sitting in the pressed in race, the grease seal is next to go into position. I liberally greased the inner area of the seal and put a good film on the rubber surface where it would contact the spindle.
With the seal squarely sitting in the hub, I took my handy-dandy seal pusher inner tool and did just that, pushed the seal into the hub. A few taps with the hammer set it properly into position. I was almost done!
Before the hub was slipped back over the spindle, I applied a thin film of wheel bearing grease to the shank of the spindle. The outer bearing was set into position after it too was packed with grease (using the same method as was done on the inner bearing).
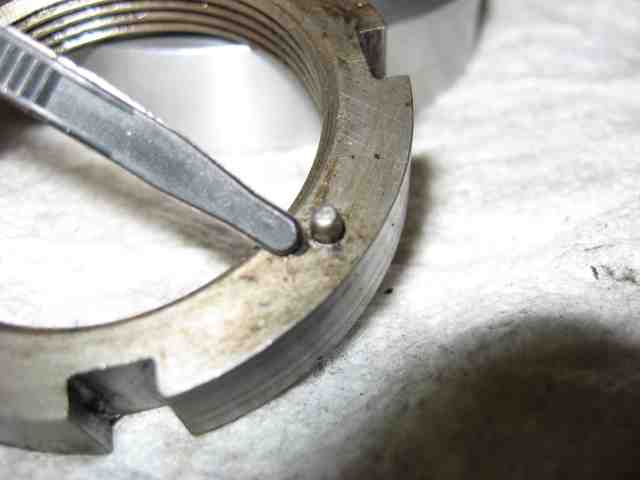
When you put the inner locking nut on, be sure the side with the small pin is facing outwards, away from the hub.
From here, follow the process previously covered for installing the lock washer and lock nuts.
That is about it for the hub maintenance project. It you made it this far, I guess there must have been some motivation behind your doing it (or you had a problem going to sleep and was just up surfing the internet). I hope you have picked up some helpful information in this write-up.
Good trails and remember to TREADLightly!