Note: You are modifying a part of your Jeep that controls engine RPMs. Doing so can change the manner in which your vehicle operates both on and off the highway. If you have any concerns or questions, you should seek the assistance of a training professional. I am describing to you what I did, and not telling you what you should do.
I wanted a hand throttle a few weeks ago for an upcoming weekend ride. I didn’t have time to go shopping around, etc., so I decided to see what I could put together myself. Total cost was $4 US. I will admit right now that it might be twice that amount for other people on account of guys at the bike shop cut me a pretty good discount.
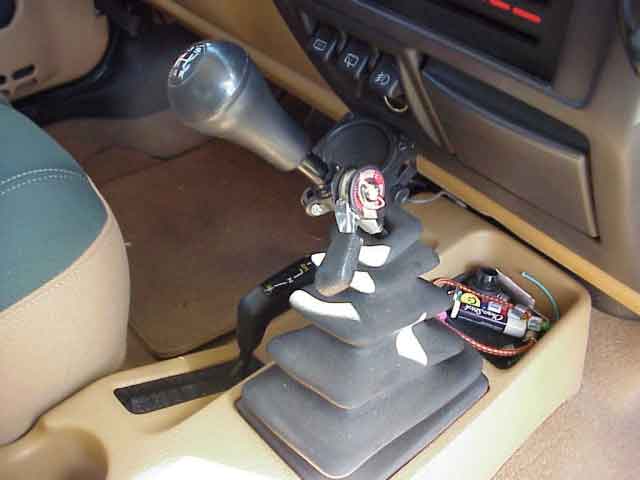
The first picture shows the actuator mounted on the gear shift. It is a non-indexed rear derailuer shifter for a mountain bike (cost $4). They usually come in a couple of cable lengths. I got the longest one they had and did not have to cut any of the outer cable cover material. The shorter one would not have been long enough. The actuator is designed to fit a mountain bike handle bar, and so was too loose on the gear shift. I took a piece of 1/2″ PVC pipe, about 1″ in length, and cut a slit length wise on the pipe. The pipe is flexible enough that you can pry it apart with a large screwdriver and slip it onto the gear shift lever. A few wraps of black electrical take to cover the white pipe, and you have a custom made spacer (I don’t think you can even see it in the picture). Place the actuator around the spacer and clamp everything down tight. You will want to position the actuator on the shift lever in a position that is comfortable for you. I routed the cable assembly down inside the boot, under the console, and forward to the firewall. You can penetrate the firewall by putting a hole in the BIG rubber plug, just above the gas pedal.
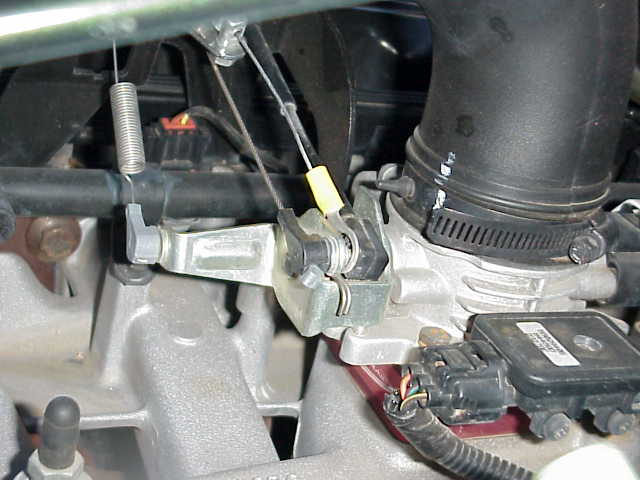
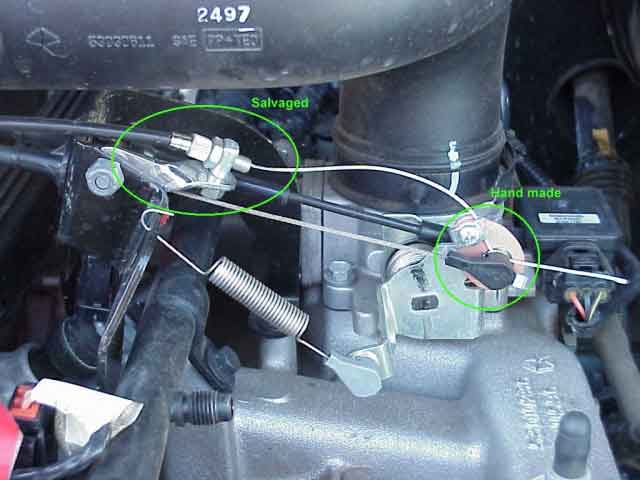
This next photo show the business end under the hood. This is where you will have to improvise a bit for your installation. The piece I have circled with “Salvaged” by it was stripped from a old 10 speed road bike. It was part of the rear brake assembly and terminated the brake cable much in the same fashion as shown here in the picture. I had to drill a hole to mount the bracket and used the nylon-insert nuts to make sure it did not vibrate loose. If you don’t have cruise control (I do), there is a spot already there for the cruise control cable. You could probably mount the hand throttle cable in that hole.
I had to come up with something to attached the cable to the throttle linkage. This is shown in the picture as “Hand made”. I had to make sure it would no interfere with the cruise control cable. You could probably get the plastic snap on cable end from the dealership if you don’t have cruise control and terminate the hand throttle with that. I took a small piece of copper-clad fiberglass circuit board material (you should be able to get this at Radio Shack) and did a bit of drilling and filing. What I ended up with was basically a tear drop shaped washer that is held in place by the cruise control cable end. (see next picture)
The cruise control cable has been “un-snapped” in this picture so you can see the details. The hand throttle cable is clamped to the circuit board material with a small cable clamp (part of the bike brake assembly I stripped to get the other mounting bracket). The cable free-play can be easily adjusted by loosening the screw, adjusting the cable, and tightening it back up. Now that everything is done and I have gotten everything adjusted, I need to cut the excess cable off. I did not initially trim the cable until I had a chance to use it on the trail several times and was certain everything was working properly.
How does it work….pretty good for $4 and an hour of tinkering. I wish it was a bit less “sensitive”. If the actuator’s cable drum (the part that the cable wraps around as you rotate the lever) was a little bit smaller, it would be allow you to move the lever further and give less throttle change. ( I am not so sure that the actual kits you can purchase don’t use mountain bike shifter levers too.) That’s it. Easy to do and nice to have when crawling over those bumpy trails….no more of that gas-pedal induced whiplash!

March 2001 – Somewhere along the way, I dumped the little fabricated bracket in the above photo and replaced it with an electrical terminal lug, as shown int he picture below. It probably had something to do with being satisfied with the cable length, knowing it was not going to stretch, etc….so I cut off the excess shifter cable and crimped the terminal lug on.