-
What is GPS?
-
Garmin GPS II Plus Receiver
-
Garmin GPS III+ Receiver
-
Garmin StreetPilot III Receiver
-
OziExplorer GPS Mapping Software
GPS – What is it?
Imagine being able to pinpoint your position anywhere on the face of the earth 24 hours a day – down to an accuracy of 100 feet (30 meters) or even less. And in any kind of weather, blinding rain or driving snow white-out. And on any surface – land, sea or air.
The Global Positioning System utilizes the $13 billion system of satellites in sun-synchronous orbit above the earth, developed by the US department of defense. Access is free to all users and provides accurate location and timing information. GPS is literally revolutionizing a host of activities including air, land and sea navigation, vehicle and vessel tracking, surveying and mapping, asset and natural resource management, and network synchronization. An example of GPS being used in the 21st century is in the iphone from o2. They have managed to use a mix of GPS and cell tower triangulation in their latest mobile phone to allow mapping through custom apps and of course the well known Google maps application.
Imagine you are Robin Hood and you are leading your merry men from one point to another. Using hand-held GPS you record your location at the point of starting (Sherwood Forest). Along the way you store your position at regular intervals. Lost your camp in Sherwood Forest? You just backtrack using the GPS and it will guide you to each of the stored locations.
Ok, now you are Goldilocks, intent on finding the house of the Three Bears. You know the general location so you do a structured search in the woods. Record your start location and start searching. When you find the house – record the location – and any time you feel like a bowl of porridge the data in your GPS will guide you right back to the spot. Alternatively use the start location and direction finding facilities of your GPS to find your way home. Very useful for those occasions when you need to get out of a tight spot fast.
Garmin GPS II Plus Receiver
I bought (and later traded away) the Garmin GPS II Plus handheld receiver. It replaced my older Garmin 40, which I had been using for a number of years. How do I like it? IT IS GREAT! I was not aware of just how much progress had been made by the folks at Garmin. The GPS II Plus provides maidenhead grids, which is used in many of the ham radio contests. Being able to quickly determine your grid square is a nice plus during contest rover operation.
My GPS 40 did not do very well when walking through a forest, or when the horizon was partially blocked such as is often the case when driving in the mountains in Arizona. The GPS II Plus has much better sensitivity (or the external antenna is much better than the internal patch antenna). I used to get the good old “Poor satellite coverage” message on my GPS 40 quite often. I have yet to get that on GPS II Plus. In fact, I tried it while sitting in my living room, which is pretty much centered in my house. It showed good receive strength on 3 birds and adequate on another one. Not bad for being inside a wooden building.
One of the main reasons I selected the GPS II Plus was for the external BNC antenna connector. Having had less than desirable experiences with the GPS 40, I wanted to be able to use an external amplified antenna. I did a lot of web searching, and spoke with a local friend to get some more information.
During a recent business trip to Pennsylvania, I took the GPS II+ along. After plugging the power cord into the rental car’s cigarette lighter socket, I was surprised (not to mentioned impressed) to see it acquire 6 sats and locked on to them in less than 30 seconds. I checked the distance back to my home in Arizona and found it to be almost 2100 miles. I was expecting the receiver to take a minute or two to figure out where it was, since the last time it had a good fix was back in Arizona. I would give it a grade of A+ in the warm start category based on this performance.
It would seem that one of the best after-market antennas come from Lowe Electronics, in the UK. I could not find a single bad comment about this antenna. It is very small, magnet-mount 26dB amplified antenna. I found a very friendly US dealer (so you don’t have to order it to from from England). The name of the dealer is Les Sullins, at D & L Antenna Supply. D & L can be reached at either 3410 Gibbs Road, Kansas City, KS 66106-3308, or via e-mail at [email protected]. You can call them at 913-677-8674, or use the toll free fax order line 1-800-912-9293. By all means, check out their web site at www.wavehunter.com.
Garmin GPS III+ Receiver
I traded off an old 486 notebook PC and my II+ receiver for an almost new III+ receiver. I had pushed the limits of my II+ and was looking for several features that the II+ could not offer; more track log points and the map uploads from the Garmin MapSource software to name a few. The 1900 track points, when running at 30 second intervals, works very well. I get tracks that are accurate enough to easily repeat, and I can run all day without filling up the memory. I use the MapSource Roads & Rec CD and have found it to be a great addition to my off-road travels. I was surprised to find that many Jeep trails are on it. And even if they are not, there is plenty of other information that helps one determine where you are. I still (and always will) rely heavily on OziExplorer and my collection of 7.5′ USGS topo CDs, as well as the maps I can print from Ozi. All together, it makes for a great navigational aid.
The III+ has better pixel resolution. It took me a while to get use to it, since the lettering was a bit “thinner” and I was use to the big fat characters from the II+. The III+ also has excellent receiver characteristics and I have no trouble tracking the sats from within my Jeep while using the stock antenna. The more I use it, the more comfortable I get with it. I wish Garmin had made the option to turn the track log on and off a bit easier to access. It is buried down about 3 or 4 menu levels. I find myself digging for it time and time again. Oh well, maybe the next generation of firmware will allow you to have a user defined interface (although you can change many of the display fields on several of the III+ viewing screens now).
I highly recommend this GPS receiver for anyone that is serious about off-roading. Combined with good mapping software (aka., OziExplorer and DRG topos), it makes it really easy to enjoy the scenery and not worry so much about taking the wrong turn!
Garmin StreetPilot III Receiver
No, I didn’t buy this pricey little GPS receiver. However, a good friend of mine recently purchased one and was kind enough to let me try it out for a few days. I was at his house when he offered to let me try it. Upon leaving his place, I plugged in the 12V power cord and fired up the GPS. Having owned had 3 Garmin GPS receivers before trying this one, I decided to see how easily the StreetPilot III “drove” without looking first at the owners manual. I quickly determined how to enter my street address, along with my city and state, and told it to calculate a route to my home. I was about 3 miiles and 3 turns away from the house when I did this….a simple enough test. The Garmin MapSource North American City Navigator CD that came with the unit had been uploaded into it so I was all set to go.
Sure enough, it told me I was about 1.2 miles away from making my first turn. After the turn, it again announced how far I had to go on Camelback before turning left on to the side street that would then have me about 3 blocks from my house. At that point, I became very disappointed with the route directions. I am not quite sure where it thought my house was located, but let me tell you that had I followed the directions, I would not be sitting here in front of my PC typing this review. Even when I pulled into my driveway, it kept telling me I needed to turn north and drive someplace….beats the heck out of me. Did it get me close? I guess so….but for this much money, I would have thought it would have at least gotten me onto the correct street.
As for the receiver, I am NOT impressed. I sat the new StreetPilot III on my desk and pulled out my trusty old III+ so I could do a side by side comparison. Both are using the little Garmin stick antennas that attach to the back of the unit. It took the StreetPilot III almost 5 minutes to announce that the satellite coverage was poor. I checked the satellite page to find that it had a 2D lock on just 3 sats. In contrast to this, my III+ had a 3D lock on 7 sats in just 15 seconds. Oh yeah….did I mention they were sitting side by side on my desk? Even after letting it run for a longer period of time, it never made it to more than 4 sats….and the signal strength of those were showing to be half of what my III+ was pulling in. Several minutes later, my III+ was showing only 5 strong sats when the StreetPilot announced that it had lost contact with the sats (I checked the status screen and it was showing 2 weak sats). Later on, it started track 5 or 6 sats with 3 or 4 of them showing good strength….I still don’t quite understand why the brand new StreetPilot III is show sub-standard performance compared to my several year old III+. Oh…in case someone was wondering, they were both connected to a 12V power source so it was not a case of having weak batteries.
I was poking around in the menu screen and found the track log function. It was on (so I turned it off) which meant that it had recorded my route coming home. Now it is possible that the feds have enabled the selective availability on the GPS sats since we went to level orange the other day for the Homeland Security status. If selective availability had been turned on, this would certainly explain why the directions I was getting were off somewhat. I started OziExplorer and downloaded the track log into it. I brought up the appropriate USGS topo map and checked to see if my house was at the end of the track. Sure enough, it was….the track came right down the street in front of my house, yet, according to the route screen, I was more than 100 yards south of my house. So….according to my mapping software, the GPS has me sitting right where I should be….but the automatic route program in the StreetPilot III says I need to be another street over. Now you tell me, what the heck good is a “StreetPilot” going to do me when IT can’t figure out where IT is?
OK….maybe this wasn’t much of a scientific review, but all in all, the only thing I find impressive is the color display. After that, I’ll take my old III+ since the receiver seems to do better and it won’t eat a half dozen batteries in as little as 2 hours (2 to 20 hrs is what the StreetPilot III book says).
Garmin III+ Mounted
Garmin offers a couple of various methods by which to mount their GPS receivers. I opted for a mount that would orient my III+ receiver in the horizontal format. Likewise, I wanted to be able to easily remove my GPS receiver (to prevent theft, use it in another vehicle, take it into the house to upload map data, etc.). I checked at the local outdoor sporting goods store and found a mount that would do just what I needed.
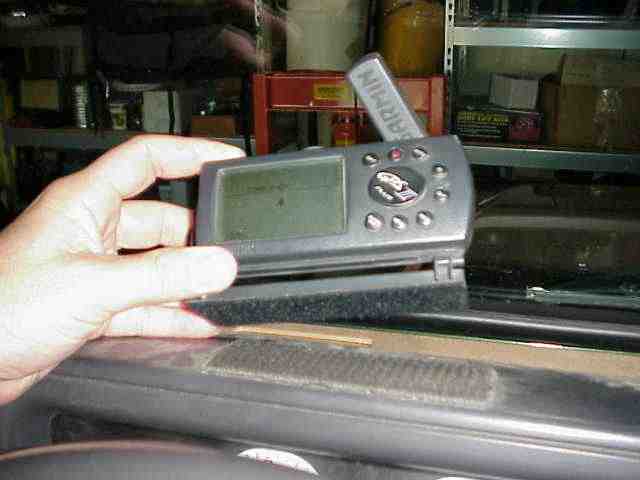
I settled on the Garmin mount pictured above. It snaps/screws onto the receiver and has an adjustment that pretty much allows for any viewing angle you could ask for. I used some 2″ wide hook and loop tape to secure the mounting base to the top of my dash. That satisfied the requirement that it be easy to removed from the Jeep.
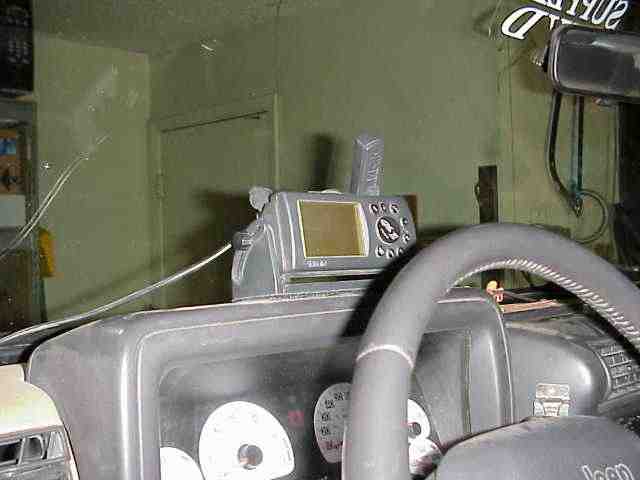 I use a Garmin 12 VDC cord to power the unit. It drops behind my dash and hooks up to the +12V unswitched lead by the fuse box. (I had to use it for something, right?) Even if accidentally left on, the receiver draws so little current that the Yellow Top battery will run it for weeks without a problem. On the left side of the mount is the thumb screw that is used to adjust the viewing angle of the receiver.
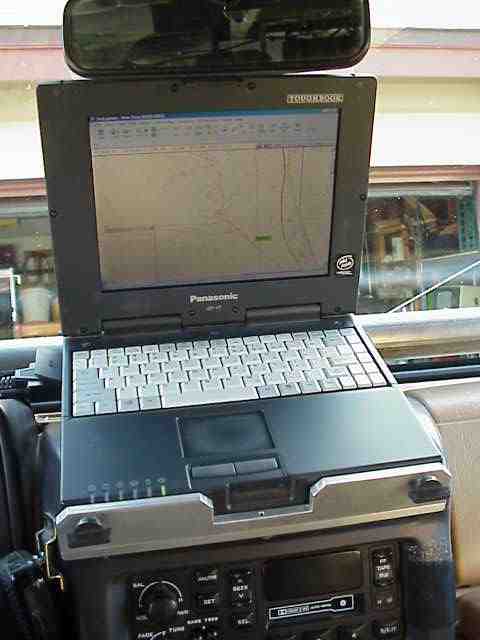
Sorry for the grainy picture….low ambient light in the garage (the flash kept washing out the display). I wanted you to see a picture of what it looks like from the driver’s seat. The antenna can be titled off to the side at the cost of reduced signal strength. Out here in the desert, that is really not much of an issue.
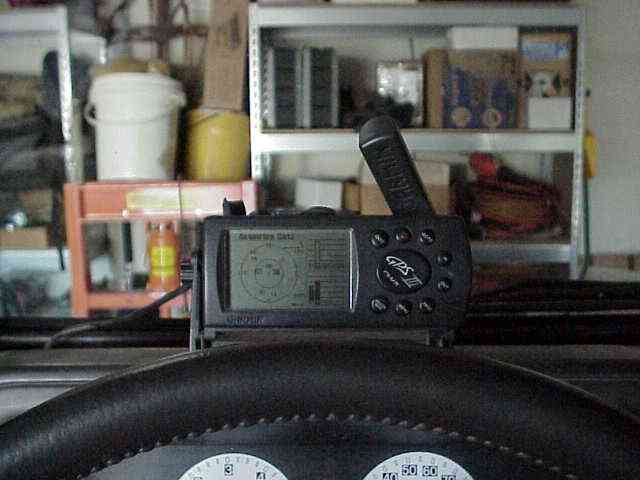
So, there you have it, a simple and effective mounting system for the Garmin III+. This same setup would work with the Garmin V as well.
TJ Mobile Mapping
Mobile mapping solutions are not new technology. A good GPS receiver combined with a portable PC and software makes for a very handy companion to have along on those off-highway trips (heck, it evens works pretty darn good on the highway….but who needs it there, you have road signs to keep you from getting lost!).
For my off-highway mapping setup, I opted to use a Panasonic Toughbook notebook computer. The Toughbook series is designed for this kind of environment. Panasonic markets these notebooks as “the computers for the OUTSIDE world”. Here are the specs on my CF-17, which is no longer a current production model. They are still available on E-bay and at some internet computer stores.
300 MHz Celeron Processor with 192 MB RAM.
4.3 GB hard drive mounted in a gel pack
8.4″ anti-reflection 800×600 TFT touchscreen
PCMCIA slot, 9 pin serial port, USB Port
87-key keyboard, Win98, Lithium-Ion battery
built-in 56k modem, AC adapter, weighs 3.8 pounds
I grabbed the following information about the CF-17 from the GCN (Government Computer News) web site. They said;
The Panasonic CF-17 looks like a miniature version of the company’s CF-27, which the GCN Lab has driven a Plymouth Neon across with no ill effects [GCN, May 24, 1999, Page 31]. The sleek, matte black magnesium case is exactly the same as the CF-27’s. Its ability to take a lot of punishment is obvious.
For shock testing, we dropped the unit, both powered on and turned off, 20 times from a height of three feet. Each time, depending on whether it was powered during the drop, the CF-17 either turned right on during the next boot cycle or was ready for immediate use when we opened the case. The system did not so much as flinch from the shocks.
After we dried the system off, we saw no effects on either benchmark performance or general operation. Only the “Intel Inside” sticker suffered. It nearly steamed off the case. In the second moisture test, we turned the notebook on and dumped eight ounces of water over the keyboard. The CF-17 continued to work even when we pushed the keys and completely submerged them. And we’re glad to report that no one was electrocuted during the testing.
Before I go any further, this project is a little different than most of those I write-up. This is still a work in progress. To be more exact, this is my first installation of the Toughbook in the TJ and it won’t be the last. I want to keep this a bolt in project if at all possible. Since the Jeep will probably outlast the PC, I would just as soon not have welded brackets to deal with at a later date.
So the mounting method is still on going and will probably be changed down the road a time or two. I would like to try a low profile swivel base if I can find one for a realistic price. I’ve already had a couple of minor strokes after seeing the prices from some of those .com stores. OUCH! I don’t want to make their car payment just so I can get a notebook mounting bracket!
I use two different software applications for off-roading. Garmin MapSource allows me to upload supplemental maps to my Garmin III+ receiver. Since I will not always want or need the Toughbook running all the time, enhancing the base maps in the Garmin receiver provides good mapping information for most trail rides. I use OziExplorer for all of my GPS track and waypoint management tasks. I have tried several Delorme products (3-D Topos, etc.) but I find myself going back to OziExplorer each time. With its support for the USGS 1:24000 topo maps (7.5′ quadrangle maps), it is really a great piece of software and cheaper than any other mapping application I have tried.
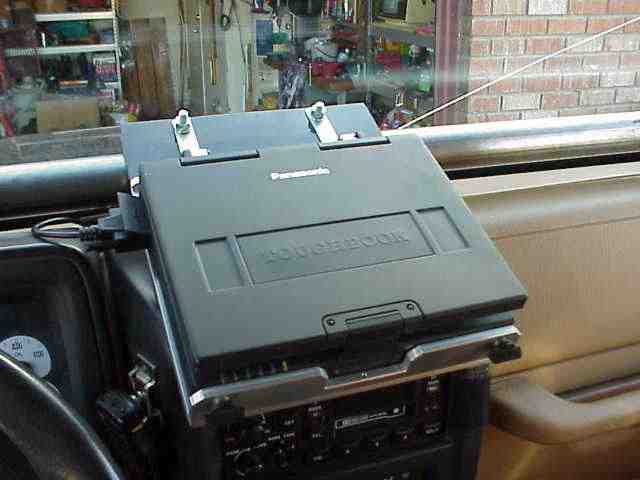 I had an aluminum mounting platform made from 1/4″ plate. A friend of mine builds custom mounting solutions for electronics equipment normally used in mountain top radio installations. The aluminum platform is also a work in progress. I need to cut a couple of quarter inch slots in it to facilitate the easy removal of the Toughbook from the mounting platform. The aluminum platform is basically form fitting to the Toughbook.
The bottom is tapped with three 1/4″x20 holes. In the above picture, the aluminum platform is bolted to a 1/4″ thick piece of Plexi-glass. The Plexi-glass is attached to the dash bar by two 1-3/4″ u-bolts. I hope to have a couple of two piece mounting brackets machined for the next mounting setup. They will accomplish the same purpose as the u-bolts while being easier to install and adjust. (remember, a work in progress!)
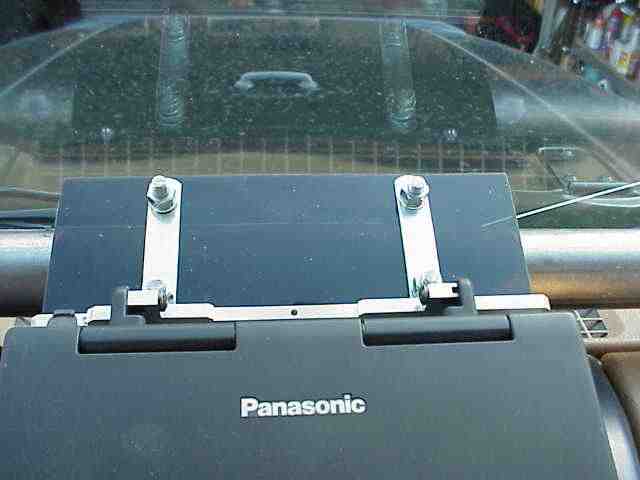
The Toughbook comes with a heavy duty carrying handle. I removed the handle so that the mounting brackets could be used to secure one end of the laptop to the aluminum platform.
If I can get the mounting brackets machined, I’ll be able to get rid of the ugly u-bolts and go with some button hex head fasteners.
 While the Toughbook can run on battery power, operation would be limited to about 90~120 minutes. The 110 VAC power inverter which has been in the TJ for quite some time is used to power the Toughbook during normal use. Since the inverter is wired to the aux fuse panel, it can be powered up at any time. The Optima Yellow Top should keep things going for a while.
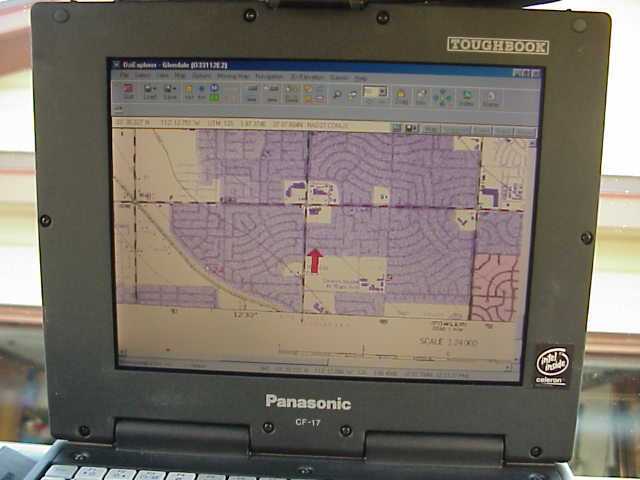
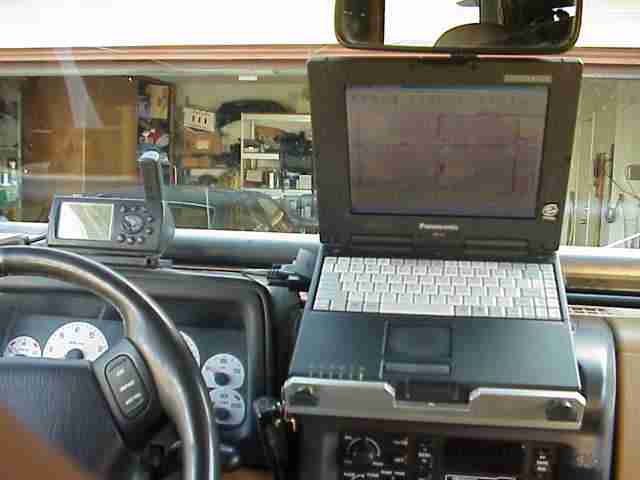
The red arrow is from the moving map display function in OziExplorer. It shows me pointing north on the street I happen to live on. The contrast on this TFT touch screen is pretty good. These pictures were taken a few days ago while I was parked in my drive way. A Toshiba notebook that saw regular trips with me in the TJ was almost impossible to view in daylight.
Note the screws holding the LCD panel bezel in place. This is not a plastic notebook. The Toughbook has a magnesium alloy case with no vents (conduction cooling through the metal) and all the data ports have rubber plug covers. This notebook is made for the rigors of OHV use (so says Panasonic). Time will tell if it lives up to its reputation or not.
 The front of the magnesium alloy case has depressions in it that are used by the Toughbook’s docking station. The spring loaded thumb screws secure the front end of the Toughbook in the aluminum platform. I have the option of using either a PCMCIA Ethernet card (and cable) or a USB wireless module to update the Toughbook’s software. Plans are to pick up a PCMCIA wireless card to keep things a little more compact.
My original plan was to mount the aluminum platform to the roll bar spreaders where they meet up with the TBT roll bar. I have software to invert the Toughbook’s video display and the touch screen calibration program allows me to calibrate it for use “upside down”. OziExplorer can easily be controlled via the plethora of on-screen menus and toolbars, so the keyboard being upside down would not be a hindrance. However, that also meant moving one or both of my radios and I was not sure where they would end up at…..so……I decided to try the dash bar as a mounting point. As I said, time will tell how this works out. For those that were wondering, the inverting software is called Pivot Pro and is from www.portrait.com
I’ll try to keep this page updated as I work my way through other mounting setups. With luck, I’ll have it all ironed out in a few months (given time and opportunity!).
Update: Feb. 23, 2004
It’s been several months since the Toughbook was installed in the TJ. It is doing just fine. Every now and again I use the CO2 tank to blow the dust off of the keyboard and LCD screen. It has stood up to the trails and vibrations of the access roads. I’ve not had to use it a lot while off-road but have ran it for several hours at a time just to make sure it would survive as advertised. So far, so good!
I did change the orientation of the mount just a bit. In the pics above, the Plexi-glass rests on top of the dash bar and the u-bolts come up from the bottom. I switched that around so the Plexi-glass is beneath the dash bar and the u-bolts come down from the top. It looks better this way (no exposed u-bolt ends) and works just as well from a functional aspect.
Update: Jan. 17, 2005
Almost another year has passed since I last updated this article. Unfortunately, the mounting configuration remains as it was…..it happens….what which was going to be a temporary solution beccame permanent. I sill need to address those ugly u-bolts. As for the computer, it is alive and doing well. The battery died about 2 months ago (not too bad given how old this unit was (it came configured with Windows 98). It is my opinion that laptop batteries enjoy being used and this battery really didn’t see that much use. Anyway, the AC power inverter continues to power it just fine even though the battery light flashes at me to indicate that there is a problem.
As for the hard drive and such, it is alive and well too. Every now and then, Win98 will lock up but that does not come as a surprise to anyone that has ever used Win98. I had the unit up and running all day long for a run just this past Christmas. Never burped during the entire day. I reconfigured the Toughbook’s settings so that the display is turned off when the lid is closed but the PC continues to function. On the trail, I can easily close the lid to give me an unobstructed view of the trail and then pop it open when needed to determine which fork in the trail is the desired route.